此案例为用户登录案例——Servlet、JDBC、JavaBean的综合练习的新增验证码需求的案例,整体框架与用户登录案例完全一致。
一、验证码案例需求
1. 用户访问带有验证码的登录页面login.jsp。
2. 用户输入用户名,密码以及验证码。
* 如果用户名和密码输入有误,跳转回登录页面,提示:用户名或密码错误。
* 如果验证码输入有误,跳转登录页面,提示:验证码错误。
* 如果全部输入正确,则跳转到主页success.jsp,显示:[用户名],欢迎您。
3.其中,生成的验证码存储在Session中。对数据库的相关操作与登录案例一致,采用Druid连接池、JdbcTemplate完成。User类符合JavaBean规范,User对象使用BeanUtils完成自动封装。
二、案例分析

三、实现步骤
1.编写生成验证码的Servlet,放在servlet包下。
直接用别人写好的即可。而且以后如果真的要用到验证码肯定是直接调用接口,而不是自己去写。
第39-41行将生成的验证码转换成字符串并存入Session是重点。
CheckCodeServlet.java
package CheckCodeDemo.servlet;

import javax.imageio.ImageIO;
import javax.servlet.ServletException;
import javax.servlet.annotation.WebServlet;
import javax.servlet.http.HttpServlet;
import javax.servlet.http.HttpServletRequest;
import javax.servlet.http.HttpServletResponse;
import java.awt.*;
import java.awt.image.BufferedImage;
import java.io.IOException;
import java.util.Random;

@WebServlet("/checkCodeServlet")
public class CheckCodeServlet extends HttpServlet {
    protected void doPost(HttpServletRequest request, HttpServletResponse response) throws ServletException, IOException {
        int width = 100;
        int height = 50;

        //1.创建一对象,在内存中图片(验证码图片对象)
        BufferedImage image = new BufferedImage(width, height, BufferedImage.TYPE_INT_RGB);
        //2.填充背景色
        Graphics g = image.getGraphics();//画笔对象
        g.setColor(Color.PINK);//设置画笔颜色
        g.fillRect(0, 0, width, height);
        //3.画边框
        g.setColor(Color.BLUE);
        g.drawRect(0, 0, width - 1, height - 1);
        //4.生成验证码
        String str = "ABCDEFGHIJKLMNOPQRSTUVWXYZabcdefghigklmnopqrstuvwxyz0123456789";
        Random ran = new Random();
        StringBuilder sb = new StringBuilder();
        for (int i = 1; i <= 4; i++) {
            int index = ran.nextInt(str.length());//随机角标
            char ch = str.charAt(index);//根据角标的值获取字符
            sb.append(ch);//将随机字符写入到StringBuilder
            g.drawString(ch + "", width / 5 * i, height / 2);//画验证码
        }
        //5.将生成的验证码转换成字符串并存入Session
        String checkCode_session = sb.toString();
        request.getSession().setAttribute("checkCode",checkCode_session);

        //6.画干扰线
        g.setColor(Color.GREEN);
        //随机生成坐标点
        for (int i = 0; i < 10; i++) {
            int x1 = ran.nextInt(width);
            int x2 = ran.nextInt(width);

            int y1 = ran.nextInt(height);
            int y2 = ran.nextInt(height);
            g.drawLine(x1, y1, x2, y2);
        }
        //7.将图片输出到页面展示
        ImageIO.write(image, "jpg", response.getOutputStream());
    }

    protected void doGet(HttpServletRequest request, HttpServletResponse response) throws ServletException, IOException {
        this.doPost(request, response);
    }
}
2.编写login.jsp,放在web文件夹根目录,用户用户访问。
login.jsp
<%@ page contentType="text/html;charset=UTF-8" language="java" %>
<html>
<head>
    <title>登录</title>
</head>
<body>
<form action="/Session/loginServlet" method="post">
    <table>
        <tr>
            <td>用户名</td>
            <td><input type="text" name="username"></td>
        </tr>
        <tr>
            <td>密码</td>
            <td><input type="password" name="password"></td>
        </tr>
        <tr>
            <td>验证码</td>
            <td><input type="text" name="checkCode"></td>
        </tr>
        <tr>
            <td colspan="2"><img src="/Session/checkCodeServlet"></td>
        </tr>
        <tr>
            <td colspan="2"><input type="submit" value="登录"></td>
        </tr>
    </table>
</form>
</body>
</html>
3.User类包含的属性:用户名、密码、验证码,使用JavaBean规范。
数据库:Druid连接池、JdbcTemplate完成数据库的连接和执行SQL语句,使用登录案例的qiniuyun数据库和其中的user表。
UserDao和登录案例完全一致。
以上内容自行完成,和用户登录案例——Servlet、JDBC、JavaBean的综合练习几乎没有任何区别。
4.编写LoginServlet,先判断验证码是否正确,再查询数据库,可以减少对数据库的开销。登录成功将用户名存储到Session中,登录失败则把相关错误信息存储到Session中,在登录页面上显示错误信息。
package CheckCodeDemo.servlet;

import CheckCodeDemo.dao.UserDao;
import CheckCodeDemo.domain.User;
import org.apache.commons.beanutils.BeanUtils;

import javax.servlet.ServletException;
import javax.servlet.annotation.WebServlet;
import javax.servlet.http.HttpServlet;
import javax.servlet.http.HttpServletRequest;
import javax.servlet.http.HttpServletResponse;
import javax.servlet.http.HttpSession;
import java.io.IOException;
import java.lang.reflect.InvocationTargetException;
import java.util.Map;

@WebServlet("/loginServlet")
public class LoginServlet extends HttpServlet {
    protected void doPost(HttpServletRequest request, HttpServletResponse response) throws ServletException, IOException {
        try {
            //1.页面编码统一
            request.setCharacterEncoding("utf-8");
            //2.获取参数Map和Session对象
            Map<String, String[]> map = request.getParameterMap();
            HttpSession session = request.getSession();
            //3.使用BeanUtils快速封装User对象
            User loginUser = new User();
            BeanUtils.populate(loginUser, map);
            //4.获取生成的验证码和用户输入的验证码
            String checkCode_session = (String) session.getAttribute("checkCode");
            String checkCode_user = loginUser.getCheckCode();
            //5.获取到生成的验证码后,删除session中的验证码,防止被重复使用
            session.removeAttribute("checkCode");
            //6.判断验证码是否正确(忽略大小写比较字符串)
            if (checkCode_session != null && checkCode_session.equalsIgnoreCase(checkCode_user)) {
                //6.1 验证码正确,检查用户密码是否正确
                User user = new UserDao().login(loginUser);
                if (user != null) {
                    //登录成功
                    //存储数据
                    session.setAttribute("user", user.getUsername());
                    //跳转到success.jsp
                    response.sendRedirect(request.getContextPath() + "/success.jsp");
                } else {
                    //登录失败
                    //存储信息到request
                    request.setAttribute("login_error", "用户名或密码错误");
                    //跳转到登录页面
                    request.getRequestDispatcher("/login.jsp").forward(request, response);
                }
            } else {
                //6.2 验证码错误
                //存储提示信息到request
                request.setAttribute("checkCode_error", "验证码不正确");
                //跳转到登录页面
                request.getRequestDispatcher("/login.jsp").forward(request, response);
            }
        } catch (IllegalAccessException e) {
            e.printStackTrace();
        } catch (InvocationTargetException e) {
            e.printStackTrace();
        }
    }

    protected void doGet(HttpServletRequest request, HttpServletResponse response) throws ServletException, IOException {
        this.doPost(request, response);
    }
}
5.实现将错误信息显示在login.jsp中,只需要在login.jsp的form表单后添加如下代码。
<div>
    <%=request.getAttribute("checkCode_error") == null ? "" : request.getAttribute("checkCode_error")%>
</div>
<div>
    <%=request.getAttribute("login_error") == null ? "" : request.getAttribute("login_error")%>
</div>
6.全部完成后,不要忘记将所有的依赖JAR包放入WEB-INF/lib目录下。
四、演示
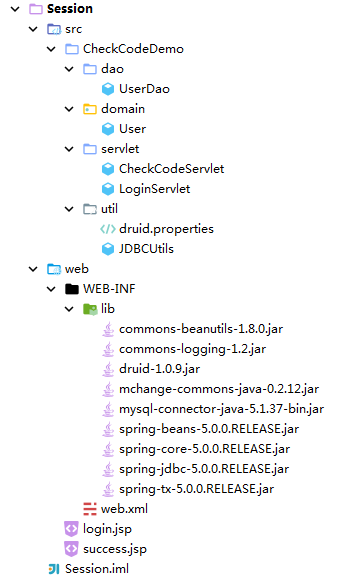
1.项目结构
2.演示效果
数据库中已有的帐号和密码如下

输入用户名:指尖代码,密码:123456,正确的验证码,点击登录

登录成功

如果输入错误的验证码,则在登录按钮下方显示验证码错误。
如果输入错误的密码,则在登录按钮下方显示用户名或密码错误。